Summary: This article discusses the new cloud hybrid search service application. Use this article to configure cloud hybrid search in your organization and learn what you need to know.
What is cloud hybrid search
In the past, Microsoft has attempted to provide hybrid search scenarios between your on-premises SharePoint environment and SharePoint Online. These solutions were based on query federation. For instance, when you searched for a document in SharePoint Online in your on-premises environment, the query would be sent to the on-premises environment, and the results are returned back to the user in SharePoint Online. Microsoft released a script to automate this: http://blogs.msdn.com/b/spses/archive/2015/11/17/office-365-sharepoint-hybrid-configuration-wizard.aspx.
In September 2015, Microsoft released the new cloud hybrid search service application.
Instead of using query federation to surface results in your environment, it relies on indexing your on-premises content in Office 365. This takes away a lot of complexity setting it up, and makes it possible to mix results from SharePoint on-premises and Office 365 in a single result block. You can set up this new feature using SharePoint 2013 or SharePoint 2016.
Figure 1 shows a representation of the “old” hybrid search architecture and figure 2 shows the “new” hybrid search architecture.
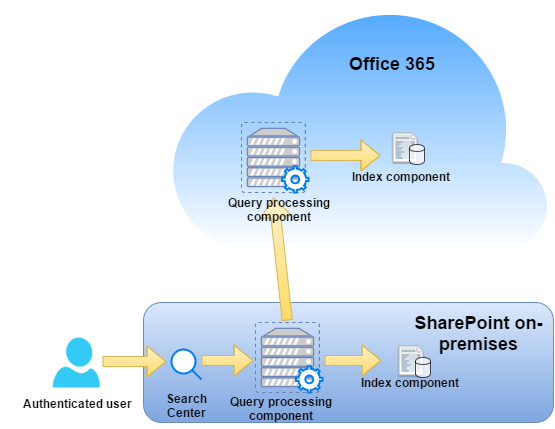 Figure 1: Hybrid federated search architecture
In this old scenario, the user enters a query in the on-premises search center. SharePoint sends the query to the on-premises query component and the SharePoint Online query component. Results cannot be interleaved out-of-the-box in this scenario, as there are separated indexes for SharePoint on-premises and SharePoint Online. However, there are several third-party solutions available that make it possible.

Figure 2: New cloud hybrid search architecture
In this scenario, the cloud search service crawls the content sources on-premises and sends the parsed content to the SharePoint Online content processing component. After processing the content and doing ACL mapping – for security trimming purposes – the data is saved in the SharePoint Online index. Because the index is saved online, it is now possible to interleave results in your search results and use the data in Delve.
Please note that the new cloud hybrid search is still in preview, so things might change along the way!
If you want your on-premises SharePoint to show SharePoint Online results, you still have to configure the outgoing federated hybrid search. See the following link for more information: http://blogs.technet.com/b/wbaer/archive/2014/03/24/one-way-outbound-hybrid-search-step-by-step-and-onedrive-for-business.aspx
Why cloud hybrid search
Not all companies are ready to make the move to the cloud for all their workloads. In order to help customers make the move for specific workloads, Microsoft now provides an easy way to gradually move to the cloud while maintaining a great search experience for end users.
By using the new Cloud hybrid search solution, users are able to search content from the following sources from within SharePoint Online:
- SharePoint 2007/2010/2013/2016
- File shares
- BCS
The index for all these sources is indexed in Office 365, which gives Microsoft the ability to interleave results across sources based on relevancy, use the Office 365 ranking model and even include all of this in Delve!
Organizations can also scale down search infrastructure as content processing and analytics are handled by Office 365.
Prerequisites for cloud hybrid search
In order to use the new Hybrid search functionality, make sure you have installed the following prerequisites for your environment.
SharePoint on-premises
- If you use SharePoint 2013, make sure you installed the August 2015 CU or later. I recommend the latest CU without known regressions, as there have been improvements to the hybrid search.
- Public preview of SharePoint 2016 IT Preview.
Office 365
The cloud search service application is currently not available for customers outside the regular Office 365 multitenant service, including China data center customers and Government cloud customers.
Account synchronization
Accounts need to be synchronized to Office 365 in order to have a single identity for users. All users that want to make use of Office 365 hybrid search need a SharePoint Online license assigned.
The tools below are supported to perform directory synchronization:
- Dirsync: https://msdn.microsoft.com/en-us/library/azure/jj151831.aspx
- AADSync: https://msdn.microsoft.com/en-us/library/azure/dn790204.aspx
- AADConnect: https://azure.microsoft.com/en-us/documentation/articles/active-directory-aadconnect/
If you do not have any of the above synchronization tools deployed in your environment, I recommend using AADConnect. It also has the possibility to configure ADFS for you, so you can enjoy the full Single-sign on experience.
Software needed during configuration of hybrid search
On the SharePoint server where you are performing the configuration of hybrid search, you will need to install the following prerequisite software in this specific order.
- Microsoft online sign in assistant: http://www.microsoft.com/en-us/download/details.aspx?id=39267
- Microsoft Azure AD PowerShell: http://go.microsoft.com/fwlink/p/?linkid=236297
Onboarding script
The onboarding script will create the trust between your on-premises SharePoint environment and Office 365. You can download the script along with documentation from the Microsoft Connect Site if you’re a member of the preview program.
If you do not have access to the cloud hybrid search preview program, you can request access via the link http://connect.microsoft.com/office/SelfNomination.aspx?ProgramID=8647&pageType=1. Make sure you are using the latest version prior to execution.
Creating the cloud search service application
After you have installed all the prerequisites, it’s now time to create the cloud search service application, which is pretty straightforward. You could use any script that you prefer; just add the parameter, “CloudIndex $true” to the New-SPEnterpriseSearchServiceApplication cmdlet.
On the server that is running SharePoint Server 2013 or SharePoint Server 2016 Preview, copy the sample script below and save it as CreateCloudSSA.ps1 and run it. This will create a single-server Search Service Application topology. If you want a highly available search service infrastructure, you have to manually adjust the script to your needs.
This script was taken from: http://blogs.msdn.com/b/spses/archive/2015/09/15/cloud-hybrid-search-service-application.aspx
## Gather mandatory parameters ##
## Note: SearchServiceAccount needs to already exist in Windows Active Directory as per Technet Guidelines https://technet.microsoft.com/library/gg502597.aspx ##

Param(
[Parameter(Mandatory=$true)][string] $SearchServerName,
[Parameter(Mandatory=$true)][string] $SearchServiceAccount,
[Parameter(Mandatory=$true)][string] $SearchServiceAppName,
[Parameter(Mandatory=$true)][string] $DatabaseServerName
)

Add-PSSnapin Microsoft.SharePoint.Powershell -ea 0

## Validate if the supplied account exists in Active Directory and whether supplied as domain\username
    if ($SearchServiceAccount.Contains("\")) # if True then domain\username was used
    {
    $Account = $SearchServiceAccount.Split("\")
    $Account = $Account[1]
    }
    else # no domain was specified at account entry
    {
    $Account = $SearchServiceAccount
    }
    $domainRoot = [ADSI]''
    $dirSearcher = New-Object System.DirectoryServices.DirectorySearcher($domainRoot)
    $dirSearcher.filter = "(&(objectClass=user)(sAMAccountName=$Account))"
    $results = $dirSearcher.findall()
if ($results.Count -gt 0) # Test for user not found
    {
    Write-Output "Active Directory account $Account exists. Proceeding with configuration"
## Validate whether the supplied SearchServiceAccount is a managed account. If not make it one.
if(Get-SPManagedAccount | ?{$_.username -eq $SearchServiceAccount})
    {
        Write-Output "Managed account $SearchServiceAccount already exists!"
    }
    else
{
        Write-Output "Managed account does not exists - creating it"
$ManagedCred = Get-Credential -Message "Please provide the password for $SearchServiceAccount" -UserName $SearchServiceAccount
        try
        {
        New-SPManagedAccount -Credential $ManagedCred
        }
        catch
        {
         Write-Output "Unable to create managed account for $SearchServiceAccount. Please validate user and domain details"
         break
         }
    }
Write-Output "Creating Application Pool"
$appPoolName=$SearchServiceAppName+"_AppPool"
$appPool = New-SPServiceApplicationPool -name $appPoolName -account $SearchServiceAccount
Write-Output "Starting Search Service Instance"
Start-SPEnterpriseSearchServiceInstance $SearchServerName

Write-Output "Creating Cloud Search Service Application"

$searchApp = New-SPEnterpriseSearchServiceApplication -Name $SearchServiceAppName -ApplicationPool $appPool -DatabaseServer $DatabaseServerName -CloudIndex $true
Write-Output "Configuring Admin Component"
$searchInstance = Get-SPEnterpriseSearchServiceInstance $SearchServerName
$searchApp | get-SPEnterpriseSearchAdministrationComponent | set-SPEnterpriseSearchAdministrationComponent -SearchServiceInstance $searchInstance
$admin = ($searchApp | get-SPEnterpriseSearchAdministrationComponent)
Write-Output "Waiting for the admin component to be initialized"
$timeoutTime=(Get-Date).AddMinutes(20)
do {Write-Output .;Start-Sleep 10;} while ((-not $admin.Initialized) -and ($timeoutTime -ge (Get-Date)))
if (-not $admin.Initialized) { throw 'Admin Component could not be initialized'}

Write-Output "Inspecting Cloud Search Service Application"

$searchApp = Get-SPEnterpriseSearchServiceApplication $SearchServiceAppName

Write-Output "Setting IsHybrid Property to 1"
$searchApp.SetProperty("IsHybrid",1)

#Output some key properties of the Search Service Application
Write-Host "Search Service Properties"
Write-Host "Hybrid Cloud SSA Name    : " $searchapp.Name
Write-Host "Hybrid Cloud SSA Status  : " $searchapp.Status
Write-Host "Cloud Index Enabled      : " $searchApp.CloudIndex
Write-Output "Configuring Search Topology"

$searchApp = Get-SPEnterpriseSearchServiceApplication $SearchServiceAppName
$topology = $searchApp.ActiveTopology.Clone()

$oldComponents = @($topology.GetComponents())
if (@($oldComponents | ? { $_.GetType().Name -eq "AdminComponent" }).Length -eq 0)
{
$topology.AddComponent((New-Object Microsoft.Office.Server.Search.Administration.Topology.AdminComponent $SearchServerName))
}
$topology.AddComponent((New-Object Microsoft.Office.Server.Search.Administration.Topology.CrawlComponent $SearchServerName))
$topology.AddComponent((New-Object Microsoft.Office.Server.Search.Administration.Topology.ContentProcessingComponent $SearchServerName))
$topology.AddComponent((New-Object Microsoft.Office.Server.Search.Administration.Topology.AnalyticsProcessingComponent $SearchServerName))
$topology.AddComponent((New-Object Microsoft.Office.Server.Search.Administration.Topology.QueryProcessingComponent $SearchServerName))
$topology.AddComponent((New-Object Microsoft.Office.Server.Search.Administration.Topology.IndexComponent $SearchServerName,0))

$oldComponents  | ? { $_.GetType().Name -ne "AdminComponent" } | foreach { $topology.RemoveComponent($_) }
Write-Output "Activating topology"
$topology.Activate()
$timeoutTime=(Get-Date).AddMinutes(20)

do {Write-Output .;Start-Sleep 10;} while (($searchApp.GetTopology($topology.TopologyId).State -ne "Active") -and ($timeoutTime -ge (Get-Date)))

if ($searchApp.GetTopology($topology.TopologyId).State -ne "Active")  { throw 'Could not activate the search topology'}
Write-Output "Creating Proxy"
$searchAppProxy = new-spenterprisesearchserviceapplicationproxy -name ($SearchServiceAppName+"_proxy") -SearchApplication $searchApp
Write-Output " Cloud hybrid search service application provisioning completed successfully."
    }
    else # The Account Must Exist so we can proceed with the script
    {
    Write-Output "Account supplied for Search Service does not exist in Active Directory."
    Write-Output "Script is quitting. Please create the account and run again."

    Break
} # End Else
The output should look similar to figure 3.
Figure 3: Create-SSA.ps1 output, creating a cloud search service application
Proxy configuration for hybrid cloud search
If your organization uses a proxy to allow Internet access, you have to configure this proxy for hybrid cloud search as well. For a more in-depth article, please look at http://sharepointrelated.com/2015/12/11/cloud-hybrid-search-proxy-settings/, but for now we can just add the proxy settings to the machine config: “C:\Windows\Microsoft.NET\Framework64\v4.0.30319\Config\machine.config”
Here’s an example of what this would look like:
<system.net>
  <defaultProxy>
    <proxy usesystemdefault="false" proxyaddress="http://10.1.10.1:8080" bypassonlocal="true" />
  </defaultProxy>
</system.net>
Place this anywhere between your <configuration> and </configuration> tag. To make it easier to find when you need it, you could place it right before the </configuration> tag.
Onboarding the cloud search service application
After successfully installing the prerequisites and configuring the cloud search service application, it is time to start the onboarding process. The onboarding process will create a trust between your SharePoint on-premises and Office 365 environment. This will allow SharePoint to move the index to Office 365 for further processing.
Run the onboarding script:
.\Onboard-CloudHybridSearch.ps1 -PortalUrl "https://yourtenant.sharepoint.com" -CloudSSAId "<Cloud Search Service Application name>"
Enter your Global Administrator credentials when prompted.
Figure 4 shows what your output should resemble.

Figure 4: Running the cloud hybrid search onboarding script on the server that runs SharePoint Server 2013
The script changes quite frequently. The script name and the parameters have changed a bit since I ran the script. Make sure you check to see what the correct parameters are when you run the script.
Configure content source in cloud search service application
You can configure the content source in your new cloud search service application as you would in any other on-premises SharePoint environment. As Figure 5 shows, you configure the content source of the cloud search service application in Search Administration.

Figure 5: In SharePoint Search Administration you can edit (configure) the content source for the cloud search service application.
Enter the start addresses that you would like to crawl and start a full crawl for the content source. After the crawl is done, check the crawl log for the specific content source to see if all went well.
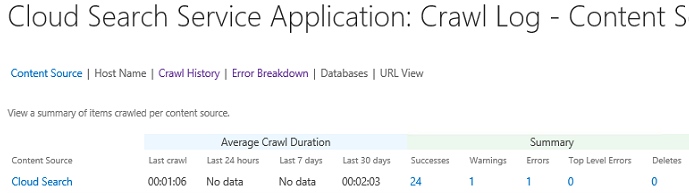 Figure 6: Check the crawl logs for any errors or warning
If you see 1 Top Lever Error with the following error message:
AzureServiceProxy caught Exception: *** Microsoft.Office.Server.Search.AzureSearchService.AzureException: AzurePlugin was not able to get Tenant Info from configuration server
 at Microsoft.Office.Server.Search.AzureSearchService.AzureServiceProxy.GetAzureTenantInfo(String portalURL, String realm, String& returnPropertyValue, String propertyName)
 at Microsoft.Office.Server.Search.AzureSearchService.AzureServiceProxy.SubmitDocuments(String azureServiceLocation, String authRealm, String SPOServiceTenantID, String SearchContentService_ContentFarmId, String portalURL, String testId, String encryptionCert, Boolean allowUnencryptedSubmit, sSubmitDocument[] documents, sDocumentResult[]& results, sAzureRequestInfo& RequestInfo) ***
Make sure to check your proxy configuration (http://sharepointrelated.com/2015/12/11/cloud-hybrid-search-proxy-settings/).
Verifying results: perform a query in SharePoint Online
In Office 365, search for a document and it will return results for both SharePoint Online and SharePoint on-premises if cloud hybrid search is configured correctly.
Figure 7 shows example results from a search that includes the following sources:
- SharePoint Online
- SharePoint on-premises
- File shares

Figure 7: Searching content in Office 365 returning results from both on-premises and SharePoint Online
If you want to return results only from your on-premises site, you can use the “isexternalcontent:1” property.
As figure 8 shows, this returns only on-premises results.

Figure 8: Using the isexternalcontent:1 property shows search results only from on-premises.
That’s it!
I hope this helps you use the new hybrid cloud search service application.
* All figures in this article were taken in a client’s test environment, with approval.


